Marble Rye Bread (and the Jelly-Roll Trick That Kills the Swirl Gap)
Sign in to see ingredients
Create a free account to unlock this content
Don't have an account? Sign up free
Per serving
Calculating nutrition...
- 1
Mix a shaggy, sticky dough
In a large bowl, whisk together 4 cups of the bread flour (hold back the last cup for kneading), the 2 cups rye flour, potato flour, milk powder, sugar, caraway seeds, yeast, onion powder and salt. In a second bowl whisk the warm water (110-115 degrees F, bath-warm, not hot enough to stun the yeast) with the oil, then pour it over the dry mix and stir until it comes together into a sticky, shaggy dough. Here's the why: rye is loaded with pentosans, gummy sugars that grab water and physically get in the way of gluten strands linking up. That's why we cut it with bread flour. All on its own, rye makes a dense brick.
- 2
Knead to build what gluten you can
Turn the dough onto a lightly floured surface and knead 8-10 minutes, working in the reserved cup of bread flour a little at a time until the dough is smooth-ish and springs back. Don't chase the silky, windowpane feel you get with a white loaf. You won't get there, and that's fine. The rye pentosans keep the dough tacky and a touch rough no matter how long you go, so knead for strength, not for perfection.
- 3
Split it and darken one half
Divide the dough into two equal pieces. Stir the 2 tablespoons dark cocoa together with 1 tablespoon of rye flour (the flour keeps the cocoa from clumping), then knead that mixture into one of the halves until the color is even all the way through. Myth-buster: the dark swirl in marble rye is NOT pumpernickel. It's the exact same dough plus cocoa, which browns the crumb without making it taste like chocolate. You're borrowing cocoa purely for color.
- 4
First rise
Oil two bowls, drop one dough into each, turn to coat, and cover with a damp cloth or plastic. Let them rise until doubled, about 60-90 minutes. Rye dough rises slower than an all-wheat dough (those pentosans again, plus less gluten to trap gas) so be patient and judge by size, not the clock. Poke it: a slow, partial spring-back means it's ready.
- 5
Roll and stack for the marble
Working one piece at a time, roll each half into a 14x12-inch rectangle, trying to keep an even thickness corner to corner. Lay the cocoa rectangle directly on top of the plain one. This is the whole ballgame for a clean swirl: even sheets stacked flush, with no trapped air between them.
- 6
The jelly-roll that kills the swirl gap
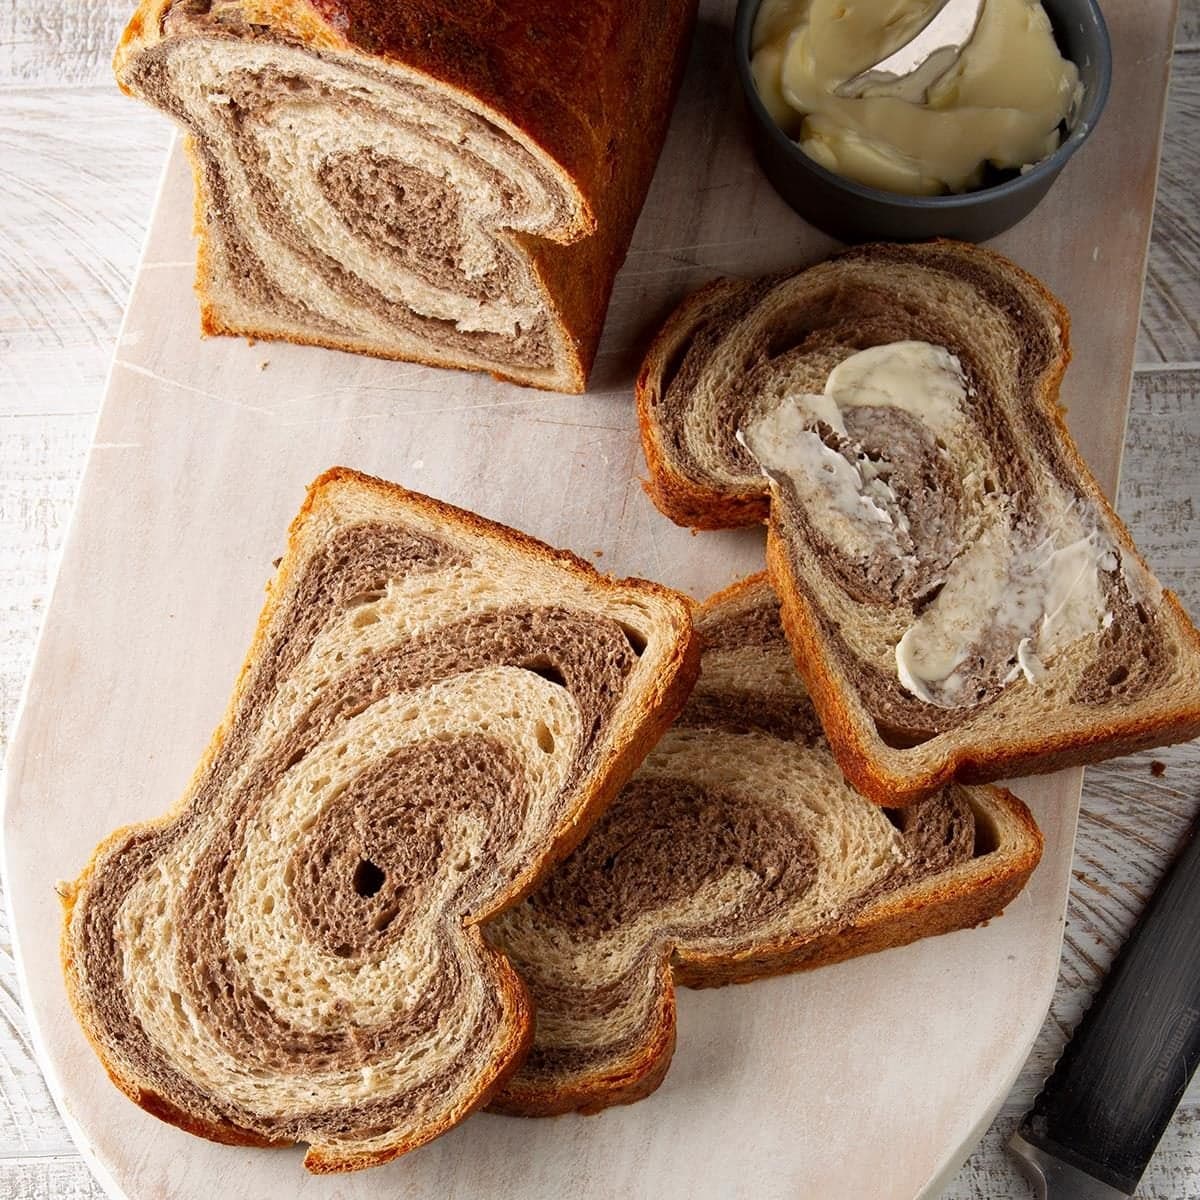
Starting from a short 12-inch end, roll the stacked dough up tightly like a jelly roll, pressing gently as you go to chase out any air, then pinch the final seam shut. The science of the dreaded swirl gap: any pocket of air trapped between the two layers turns to steam in the oven, expands, and blows the spiral apart into an ugly hole. Roll it snug and press as you turn and the layers fuse instead of ballooning.
- 7
Shape and second rise
Set the roll seam-side down in a greased 13x4-inch Pullman loaf pan and tuck the ends under for a smooth top. Cover loosely and let it rise 1 to 1.5 hours, until the dough crowns about 1/2 to 3/4 inch above the rim. Rye makes a weak dough that can't hold a free-form shape, which is exactly why a tall, straight-sided pan does the structural work for you.
- 8
Egg wash and slash
Heat the oven to 400 degrees F. Beat the egg with 1 tablespoon water and brush it over the loaf for shine and a deeper brown, then cut three or four deep, diagonal slashes across the top with a sharp knife and loosely tent the loaf with non-stick foil. The slashes aren't just looks: they give the loaf a planned place to burst during oven spring so it doesn't tear open along the side.
- 9
Bake low-and-longer, and trust the thermometer
Bake at 400 degrees F for 15 minutes, then drop the heat to 375 and bake 20 minutes more. Pull the foil and bake a final 10 minutes or so, until the crust is deep golden brown and an instant-read thermometer in the center reads 200 degrees F. Color lies and the clock lies. Internal temperature is the only honest doneness signal, and 200 degrees means the starches have fully gelatinized and set.
- 10
Cool completely before you cut
Let the loaf rest in the pan 10 minutes, then turn it out onto a wire rack and cool completely before slicing. I know. It's agony. But a hot loaf is still finishing on the inside: the crumb is setting and excess steam is escaping. Cut too early and you'll smear that gorgeous marble into gumminess. Give it an hour.
Sign in to see all instructions
Create a free account to unlock this content
Don't have an account? Sign up free
Marble Rye Bread (and the Jelly-Roll Trick That Kills the Swirl Gap)
Created by: TheBreadNerd
Ingredients
- 5 cup bread flour
- 2 cup rye flour
- 1/2 cup potato flour
- 1/3 cup nonfat dry milk powder
- 2 tbsp sugar
- 2 tbsp caraway seeds
- 3 tsp instant yeast
- 2 1/2 tsp onion powder
- 2 tsp salt
- 2 3/4 cup warm water
- 1/4 cup canola oil
- 2 tbsp dark cocoa powder
- 1 egg
Instructions
- Mix a shaggy, sticky doughIn a large bowl, whisk together 4 cups of the bread flour (hold back the last cup for kneading), the 2 cups rye flour, potato flour, milk powder, sugar, caraway seeds, yeast, onion powder and salt. In a second bowl whisk the warm water (110-115 degrees F, bath-warm, not hot enough to stun the yeast) with the oil, then pour it over the dry mix and stir until it comes together into a sticky, shaggy dough. Here's the why: rye is loaded with pentosans, gummy sugars that grab water and physically get in the way of gluten strands linking up. That's why we cut it with bread flour. All on its own, rye makes a dense brick.
- Knead to build what gluten you canTurn the dough onto a lightly floured surface and knead 8-10 minutes, working in the reserved cup of bread flour a little at a time until the dough is smooth-ish and springs back. Don't chase the silky, windowpane feel you get with a white loaf. You won't get there, and that's fine. The rye pentosans keep the dough tacky and a touch rough no matter how long you go, so knead for strength, not for perfection.
- Split it and darken one halfDivide the dough into two equal pieces. Stir the 2 tablespoons dark cocoa together with 1 tablespoon of rye flour (the flour keeps the cocoa from clumping), then knead that mixture into one of the halves until the color is even all the way through. Myth-buster: the dark swirl in marble rye is NOT pumpernickel. It's the exact same dough plus cocoa, which browns the crumb without making it taste like chocolate. You're borrowing cocoa purely for color.
- First riseOil two bowls, drop one dough into each, turn to coat, and cover with a damp cloth or plastic. Let them rise until doubled, about 60-90 minutes. Rye dough rises slower than an all-wheat dough (those pentosans again, plus less gluten to trap gas) so be patient and judge by size, not the clock. Poke it: a slow, partial spring-back means it's ready.
- Roll and stack for the marbleWorking one piece at a time, roll each half into a 14x12-inch rectangle, trying to keep an even thickness corner to corner. Lay the cocoa rectangle directly on top of the plain one. This is the whole ballgame for a clean swirl: even sheets stacked flush, with no trapped air between them.
- The jelly-roll that kills the swirl gapStarting from a short 12-inch end, roll the stacked dough up tightly like a jelly roll, pressing gently as you go to chase out any air, then pinch the final seam shut. The science of the dreaded swirl gap: any pocket of air trapped between the two layers turns to steam in the oven, expands, and blows the spiral apart into an ugly hole. Roll it snug and press as you turn and the layers fuse instead of ballooning.
- Shape and second riseSet the roll seam-side down in a greased 13x4-inch Pullman loaf pan and tuck the ends under for a smooth top. Cover loosely and let it rise 1 to 1.5 hours, until the dough crowns about 1/2 to 3/4 inch above the rim. Rye makes a weak dough that can't hold a free-form shape, which is exactly why a tall, straight-sided pan does the structural work for you.
- Egg wash and slashHeat the oven to 400 degrees F. Beat the egg with 1 tablespoon water and brush it over the loaf for shine and a deeper brown, then cut three or four deep, diagonal slashes across the top with a sharp knife and loosely tent the loaf with non-stick foil. The slashes aren't just looks: they give the loaf a planned place to burst during oven spring so it doesn't tear open along the side.
- Bake low-and-longer, and trust the thermometerBake at 400 degrees F for 15 minutes, then drop the heat to 375 and bake 20 minutes more. Pull the foil and bake a final 10 minutes or so, until the crust is deep golden brown and an instant-read thermometer in the center reads 200 degrees F. Color lies and the clock lies. Internal temperature is the only honest doneness signal, and 200 degrees means the starches have fully gelatinized and set.
- Cool completely before you cutLet the loaf rest in the pan 10 minutes, then turn it out onto a wire rack and cool completely before slicing. I know. It's agony. But a hot loaf is still finishing on the inside: the crumb is setting and excess steam is escaping. Cut too early and you'll smear that gorgeous marble into gumminess. Give it an hour.