Old-Fashioned Potato Bread (and Why Mashed Potato Keeps It Soft for Days)
Sign in to see ingredients
Create a free account to unlock this content
Don't have an account? Sign up free
Per serving
Calculating nutrition...
- 1
Cook and mash the potato
Peel and dice 1 medium potato. Add it to a small saucepan with 1-1/2 cups of the water, bring to a boil, then reduce heat, cover, and simmer until very tender. Drain, but SAVE 1/2 cup of that starchy cooking liquid — don't pour it down the sink. Mash the potato plain (no milk or butter yet). Here's the why: potato starch granules swell and hold onto water like tiny sponges, and that trapped moisture is exactly what keeps this loaf tender days after baking while a lean bread would already be going stale.
- 2
Bloom the yeast
In a large bowl, stir the active dry yeast into 1/2 cup warm water (110–115°F — warm bath temperature, not hot; anything above about 130°F starts killing the yeast). Let it sit about 5 minutes until it looks foamy and smells bready. That foam is your proof the yeast is alive and eating.
- 3
Build the dough
Warm the milk to 110–115°F and add it to the yeast along with the softened butter, sugar, salt, mashed potato, the reserved 1/2 cup potato water, and 4 cups of the flour. Beat until smooth. The potato sugars give the yeast an easy first meal, so fermentation takes off fast. Stir in enough of the remaining flour to form a stiff dough — add it gradually, since potato doughs drink up flour differently batch to batch.
- 4
Knead to develop gluten
Turn the dough onto a floured surface and knead until smooth and elastic, about 6–8 minutes. You're lining up and cross-linking gluten proteins into a stretchy web — the net that will trap the gas the yeast makes. Test it: the dough should feel tacky but spring back when poked, not tear. If you gently stretch a piece thin enough to see light through without it ripping, the gluten is ready.
- 5
First rise
Place the dough in a greased bowl, turning once to coat the top so it doesn't dry out. Cover and let rise in a warm spot until doubled, about 1 hour. Yeast is exhaling carbon dioxide and the gluten net is stretching around every bubble — that's the whole engine of a light crumb.
- 6
Shape the loaves
Punch the dough down to release the big gas pockets and even out the crumb. Turn it out, divide in half, and shape into two loaves. Set each in a greased 9x5-inch loaf pan. Cover and let rise again until doubled, about 30 minutes — this second rise is shorter because the yeast population is now huge and working fast.
- 7
Bake
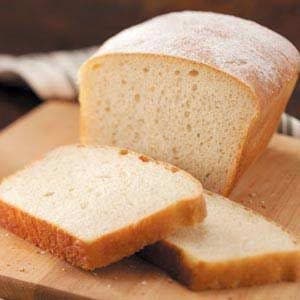
Preheat the oven to 375°F. Dust the tops lightly with a little extra flour for that rustic look, then bake 35–40 minutes until deep golden brown. The crust color is the Maillard reaction — sugars and proteins browning — and a finished loaf sounds hollow when you tap the bottom. Turn the loaves out onto a wire rack and, hard as it is, let them cool before slicing so the crumb can finish setting.
Sign in to see all instructions
Create a free account to unlock this content
Don't have an account? Sign up free
Old-Fashioned Potato Bread (and Why Mashed Potato Keeps It Soft for Days)
Created by: TheBreadNerd
Ingredients
- 1 potato
- 2 cup water
- 4 1/2 tsp active dry yeast
- 1 cup milk
- 2 tbsp butter
- 2 tbsp sugar
- 2 tsp salt
- 7 cup all-purpose flour
Instructions
- Cook and mash the potatoPeel and dice 1 medium potato. Add it to a small saucepan with 1-1/2 cups of the water, bring to a boil, then reduce heat, cover, and simmer until very tender. Drain, but SAVE 1/2 cup of that starchy cooking liquid — don't pour it down the sink. Mash the potato plain (no milk or butter yet). Here's the why: potato starch granules swell and hold onto water like tiny sponges, and that trapped moisture is exactly what keeps this loaf tender days after baking while a lean bread would already be going stale.
- Bloom the yeastIn a large bowl, stir the active dry yeast into 1/2 cup warm water (110–115°F — warm bath temperature, not hot; anything above about 130°F starts killing the yeast). Let it sit about 5 minutes until it looks foamy and smells bready. That foam is your proof the yeast is alive and eating.
- Build the doughWarm the milk to 110–115°F and add it to the yeast along with the softened butter, sugar, salt, mashed potato, the reserved 1/2 cup potato water, and 4 cups of the flour. Beat until smooth. The potato sugars give the yeast an easy first meal, so fermentation takes off fast. Stir in enough of the remaining flour to form a stiff dough — add it gradually, since potato doughs drink up flour differently batch to batch.
- Knead to develop glutenTurn the dough onto a floured surface and knead until smooth and elastic, about 6–8 minutes. You're lining up and cross-linking gluten proteins into a stretchy web — the net that will trap the gas the yeast makes. Test it: the dough should feel tacky but spring back when poked, not tear. If you gently stretch a piece thin enough to see light through without it ripping, the gluten is ready.
- First risePlace the dough in a greased bowl, turning once to coat the top so it doesn't dry out. Cover and let rise in a warm spot until doubled, about 1 hour. Yeast is exhaling carbon dioxide and the gluten net is stretching around every bubble — that's the whole engine of a light crumb.
- Shape the loavesPunch the dough down to release the big gas pockets and even out the crumb. Turn it out, divide in half, and shape into two loaves. Set each in a greased 9x5-inch loaf pan. Cover and let rise again until doubled, about 30 minutes — this second rise is shorter because the yeast population is now huge and working fast.
- BakePreheat the oven to 375°F. Dust the tops lightly with a little extra flour for that rustic look, then bake 35–40 minutes until deep golden brown. The crust color is the Maillard reaction — sugars and proteins browning — and a finished loaf sounds hollow when you tap the bottom. Turn the loaves out onto a wire rack and, hard as it is, let them cool before slicing so the crumb can finish setting.